
How to Tell If Your Attic Is Properly Insulated
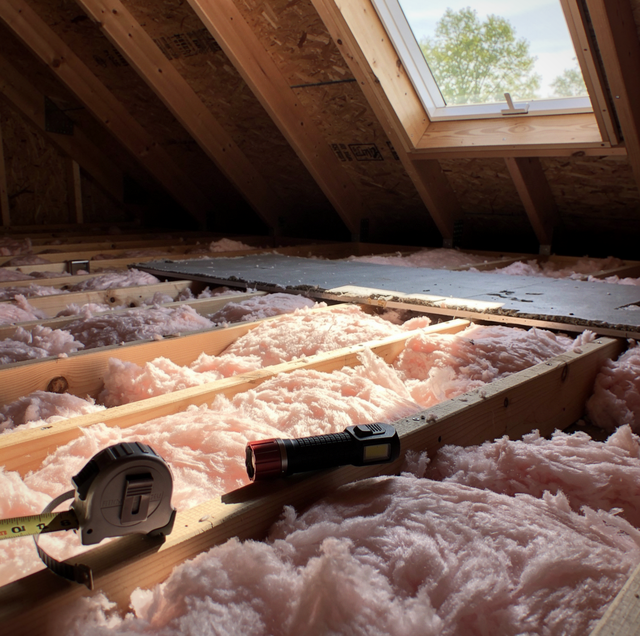
Quick Answer: Check attic insulation by measuring its depth against the floor joists, looking for bare or compressed spots, and watching for daylight or drafts coming through the attic floor. Inside the house, uneven room temperatures, ice dams at the roofline, climbing energy bills, and cold or hot ceilings all point back to the same attic. Most attics target roughly R-30 to R-60, and a professional assessment can confirm exact depth and find air leaks a visual check might miss.
Most homeowners never look at their attic insulation until something else goes wrong first: a bill that climbs for no clear reason, a room that never quite matches the thermostat, or a ceiling that feels cold to the touch in January. The insulation itself rarely announces a problem directly. It just quietly does less of its job, month after month, until the signs show up somewhere else in the house. The good news is that checking it does not require special equipment or training. A flashlight, a tape measure, and fifteen minutes in the attic will tell you most of what you need to know.
Start With a Look Inside the Attic
Before checking anything else, get eyes on the attic floor itself. Pull down the attic stairs or open the hatch, bring a flashlight, and step onto the joists rather than the insulation, since the insulation will not support your weight and the drywall below can give way. You are not looking for anything complicated. You are looking at how deep the insulation sits, how even it looks across the whole floor, and whether it looks the same in every corner or thins out in places.
Measure the depth against the joists: Attic floor joists are almost always a fixed height, typically 8 to 11 inches, depending on how the house was framed. Insulation that sits well below the top of the joists is a clear sign that the attic is under-insulated for a modern target, since older homes were often insulated to a much shallower standard than current guidance calls for. Insulation that comes up flush with or above the joists is a better sign, though depth alone does not tell the whole story, which is why the next few checks matter just as much.
Look for bare spots and thin patches: A properly insulated attic floor should look like a uniform blanket from the hatch to the eaves, without exposed joists, exposed drywall, or thin gray patches where the material has settled unevenly. Bare spots often show up around the attic hatch, near recessed lighting fixtures, along the perimeter where the roofline meets the exterior wall, and around any place a previous repair disturbed the material and it was never put back to full depth.
Check for compressed or matted insulation: Insulation works by trapping still air in millions of tiny pockets, so flattened or matted material loses much of its resistance even if it still covers the floor. Stored boxes, foot traffic from past repairs, water damage, or old pest activity can all press insulation down into a dense mat that looks intact from a distance but performs far below its original rating. Fluffy, loose-fill insulation that has settled and packed down over years is common in older attics and is worth noting even where the depth still looks reasonable.
Watch for daylight coming through the attic floor: On a bright day, turn off your flashlight for a moment and look toward the eaves and any spots where the roofline meets the exterior wall. Visible daylight coming through gaps in the insulation or around penetration points creates an open path for air and heat to move freely between the attic and the outdoors, undermining insulation performance regardless of how thick the material appears elsewhere.
Feel for drafts at the hatch and around penetrations: Hold a hand near the attic hatch, around plumbing stacks, electrical wiring penetrations, and the top of interior walls where they meet the attic floor. A noticeable draft in any of these spots means air is moving through gaps that insulation alone cannot fix, since insulation slows heat transfer but does very little to stop moving air. Sealing those gaps matters as much as the insulation depth above them.
Do this check on a day with a real temperature difference between indoors and outdoors, a cold morning in winter or a hot afternoon in summer. Drafts and cold or hot spots are far easier to feel when there is a meaningful gap between attic and house temperatures.
Signs You Can Notice Without Ever Climbing Into the Attic
Not every homeowner wants to go up into the attic, and you do not have to in order to pick up on the signs that something is off. Several clues show up inside the living space long before anyone opens the hatch.
Uneven temperatures from room to room: If an upstairs bedroom runs noticeably warmer or colder than the rest of the house, or if a room directly under the attic never quite matches the thermostat setting no matter how the system runs, thin or gapped insulation above that specific room is a common cause. Heat moves through the ceiling fastest where the insulation is thinnest, so an isolated hot or cold room often indicates a weak spot overhead rather than a whole-house problem.
Ice ridges along the roof edge in winter: A ridge of ice building up at the eaves, especially one that keeps reappearing after a cold snap, usually means heat is escaping from the living space into the attic and warming the roof deck unevenly. Snow melts on the warmer upper section of the roof, runs down, and refreezes at the colder eave, and that cycle repeats as long as heat keeps leaking upward. Ice at the roofline is a strong indoor clue that the insulation and air sealing above the ceiling need attention.
Energy bills that climb without an obvious cause: A heating or cooling system working harder than it used to, without a clear change in weather, occupancy, or thermostat habits, often traces back to conditioned air escaping through the ceiling faster than it should. Because the increase is usually gradual, it is easy to attribute to an aging furnace or air conditioner rather than to insulation that has settled, thinned, or developed gaps over years.
Ceilings that feel noticeably cold or hot to the touch: Press a hand flat against a top-floor ceiling on a cold day. A ceiling that feels close to room temperature suggests decent overhead insulation, while one that feels distinctly cold, especially compared to the walls in the same room, suggests heat moving through the ceiling faster than it should. The same logic applies in reverse during hot weather, when a ceiling that feels warm to the touch signals heat soaking down from an overheated attic.
A furnace or air conditioner that runs in longer cycles than it used to: Systems compensating for heat loss or gain through a weak ceiling tend to run longer to hold the same set temperature, which shows up as longer cycle times, more frequent cycling, or a system that seems to struggle to catch up after the thermostat is adjusted.
What R-Value Targets Generally Look Like for an Attic
Insulation performance is measured by the R-value, a rating of how well a material resists heat flow. Higher numbers mean more resistance and, generally, better performance. For attic floors specifically, most current guidance points to a general range of R-30 to R-60, depending on the insulation type, the depth achieved, and the specific recommendations for a given home and climate.
That range is wide on purpose, since attic insulation needs vary with roof design, existing ductwork or equipment in the attic, and how the home is used. What matters more for a homeowner doing a visual check is comparing what is actually there with what a properly filled attic floor should look like: full depth, reaching or exceeding the top of the joists; no bare or thin patches; and no compressed sections where the material has lost its loft. An attic that clearly falls short of those basics on a visual inspection is very likely under-insulated relative to current targets, even without pinning down an exact R-value at a glance.
It's worth remembering that R-value assumes insulation that is dry, undisturbed, and installed at a consistent depth. Wet, compressed, or gapped insulation performs well below its rated value, even if the material itself is rated at a high value, which is exactly why the physical checks above matter as much as knowing the general target range.
When a DIY Check Is Enough and When to Call a Professional
A homeowner walkthrough with a flashlight and a tape measure is a good first step, and it will usually tell you whether there is an obvious problem worth acting on. It has limits, though. It is hard to judge exact depth precisely in dim light, hard to see contamination or moisture damage tucked behind stored items, and difficult to spot air leaks that are not directly under the hatch or along an obvious path.
A professional assessment fills those gaps. A technician measures depth at multiple points across the attic rather than just near the access point, checks for moisture, pest damage, or compression that a quick look might miss, and can identify air-leak sources that are not obvious without specialized tools like a blower door test or an infrared camera. That level of detail matters most when the visual signs are mixed, when energy bills have climbed, but the attic looks reasonable at first glance, or when a homeowner is weighing whether to add insulation, replace it, or address air sealing first.
Calling in a professional makes the most sense in a handful of specific situations: when the attic shows visible moisture, mold, or past water damage; when insulation looks contaminated from pests; when ice dams have formed repeatedly despite what looks like adequate insulation depth; or simply when a homeowner wants a detailed, room-by-room read on where heat is escaping before deciding what to fix. An assessment turns a set of scattered clues, a cold ceiling here, a high bill there, into a specific plan with a clear starting point.
Frequently Asked Questions
There is no single universal number, since it depends on the insulation type and the specific target for a given home, but insulation that sits well below the top of the attic floor joists is a reliable visual sign that it falls short of common current targets. Insulation that reaches or exceeds joist height, without bare patches or compressed sections, is a better sign that the attic is closer to where it should be.
Yes. Depth is only part of the picture. Insulation that has settled and packed down over years, gotten wet at some point and then dried, or been disturbed by pests can look reasonably full while performing well below its original rating. That is why checking for matting, compression, and moisture matters alongside a simple depth measurement.
An isolated hot or cold room, especially one directly under the attic, usually indicates a localized weak spot in the insulation or an air leak above that specific room, rather than a problem affecting the whole house evenly. Checking the section of attic floor directly above that room is often the fastest way to confirm the cause.
Ice dams are among the more reliable indoor and outdoor clues that heat is escaping into the attic and warming the roof deck unevenly. They are not caused by cold weather alone, since a well-insulated, well-sealed attic can go through a hard winter without building the warm zone that starts the melt-and-refreeze cycle. Repeated ice dams are worth treating as a signal to check the attic rather than just clearing the ice each time it forms.
Stepping onto the joists rather than directly onto insulation is the safe approach, since the material itself does not support weight and stepping between joists can push a foot through the ceiling drywall below. A flashlight, sturdy footing, and a slow, careful walk along the joists are usually enough for a basic visual check without needing to move far from the attic hatch.
A quick visual check once a year, ideally at the start of the heating or cooling season, catches most developing problems before they show up as a high bill or an uncomfortable room. It is also worth a look any time something changes nearby, such as new pest activity, a roof repair, or any work that involved opening up the attic, since insulation disturbed during other repairs is not always restored to its original depth.
Schedule a free attic insulation assessment — get a clear, room-by-room read on your attic's depth, condition, and air sealing before deciding what to fix. Airflow Pro Insulation serves St. Joseph, Savannah, and Country Club. Call (816) 344-6516.
